Friday, October 31, 2014

Maleficent Horns- DIY in 5 Steps!


Maleficent Horns- DIY in 5 Steps

Happy Halloween everyone!

A friend asked if I could make Maleficent's horns to complete her costume. My initial answer was no because I didn't think I had the necessary supplies.

Then I got it into my head, "But I really really want to make them..."

As a result I ended up browsing Pinterest for inspiration and tutorials. This is the one I used mostly for inspiration --> Make Your Own Maleficent Horns

I'm very proud of how they turned out. Once I realized I had all the supplies I needed just loitering around my house they took maybe 30-45 minutes to make!

And my friend enjoys them so I'm happy. :)

Supplies:

-8 oz. plastic/paper/Styrofoam cups
-headband, the wider the better
-a lot of black electric tape
-tinfoil
-wire (I used aluminum)
-sharpie
-scissors

Step One: Tape the cups the headband. At this point they don't have to look pretty because any tape job here is going to be covered up. To get the placement right I put the head band on, held the cups on, and used a sharpie the trace their placement on the headband.


Step 2: Use scissors to stick two holes in the bottoms of the cups relatively close to each other. Thread the wire through it. As long as you want your horns to be so that you can mold the tinfoil around something and bend the horns.

(tip): Stick the wire in before you put the cups on the headband. ;)

Step 3: Take rectangle swathes of tinfoil and proceed to cover the cups and wire until they are of a satisfying length and thickness.

Step 4: Wrap with electric tape. What I did was let the tape wrap around the horns in its natural curving pattern. Don't try to wrap in neat "rows" all the way down the horn. You're going to want to try to pull the tape tightly around the tinfoil without warping the shape.

Step 5: Wrap around the tips and center of the headband to complete the wrapping process!


Here are a few extra tutorials if you're feeling adventurous!

-Make Your Own Maleficent Headband
-DIY Lightweight Horns
-How to Make Horns


Monday, October 20, 2014

Art Curriculum- Week 6- Pumpkin Books


Week 6- Pumpkin Books

First off this project is directly inspired and taken from this site: Craftberry Bush: Fall in love with Fall...

Last week I posted a quick review on our time in the Renaissance Period for the month of September. To view it click here.

What you'll need:

-construction paper
-popsicle sticks
-green/brown markers
-hot glue
-scissors

Time: 30-45 minutes tops

This project required them to practice their cutting skills.

I folded all the "pages" to the little book (each child got 8) and traced a prototype I made beforehand onto each page individually for them to cut.

Originally I stapled all the pages together to make a book, and cut all the pages in one go. Then my mother pointed out that they have little kid scissors and not enough finger strength to cut through that much paper. So I unstapled all the pages and then proceeded to trace the demo onto each page.

After they cut their pages I had them each color a popsicle stick green or brown for the stem. I hot glued the stem between 2 pages after stapling the little "booklet" together.

Then all they had to do was spread the pages so their pumpkins could stand on their own!

Overall: Depending on your age group of kids a lot of prep time, but a very easy project for little ones.
-A Poem for Fall!

(logging 2 hours for execution + prep time)

Tuesday, October 14, 2014

Art Curriculum- Renaissance in Review

Weeks 1-4: Renaissance in Review

This week we had a bit of a break due to sickness and Columbus Day.

So instead of a new lesson, I decided to post a quick overview of the first 4 weeks projects and how they're all Renaissance Inspired.

Last week's lesson was a Fall project (and also began the Impressionist period). To view it click here. Last week before our Fall project was when I did a quick review with the kids to see what they remembered.

I looked up pictures of Renaissance art and other cool pictures I liked that showcased the techniques we were doing. Then I would have them try and remember which project fit best with each picture.

Most of the photos I used as reference or inspiration for my projects can be found on Pinterest Board: Art Curriculum.

  • Week 1- Gridding: A project involving each child coloring in one piece of the bigger picture. I explained how you can transfer a photo's measurements and even make the image you're copying smaller or larger.

  • Week 2- 1 Point Perspective: A painting project which introduces distance and a horizon line for the kids. The Renaissance period was when art was up for being expanded upon. Things like color and texture had more of an impact on the feeling of closeness or realism.

  • Week 3- Tri Toned Cube: Painting a 3 toned cube to create a 3D feel. During the Renaissance shadows and light were paid more attention to. I showed them similar images of blocks and we reviewed the "light source." And I also showed showed how in normal portraits of people how the lighting was used to create depth in skin and hair.

  • Week 4- Self Portrait: Coloring and drawing their own clothing and features on a stick figure. I pointed out that like the kids added gardens or castles people would pose for hours with objects they valued like a favorite pet or a treasured sword. I also made of point of reminding them back then they didn't have cameras. It would take months and a lot of money to have someone paint a realistic portrait of themselves or family members.

This is a very basic overview. But some of them are quite young, and for now this is a good start. As they grow older they will cover the Renaissance in greater detail.

I hope this was helpful and you enjoy the projects!

(logging 1/2 hour)

Monday, October 6, 2014

Art Curriculum- Week 5- Stained Glass Leaves

stained glass leaves

Week 5- Stained Glass Leaves
Last week's lesson involved coloring and creating a self-portrait. To view it click here.

Artistic Movement: Impressionism (loosely - you can tie it in with the vibrant colors and impression of warmth and vivid happy feelings the colors are associated with)

What you'll need:

-Copy paper
-baby oil/cooking spray/canola oil (any one will do, baby oil is the most popular choice but we managed with cooking spray just fine)
-crayons
-cotton balls
-paper towels

Time: 45 minutes + 15 minute recap of previous weeks

The purpose of this lesson was to have fun and it required them to use their cutting skills.

I looked up leaf templates and coloring sheets, then I copied and pasted the ones I liked into a word document. I had 3 leaves per page. Then I ran off 6 copies of each so each kid would have 9 to color and cut.

Because some of them are young and most of them haven't built up much patience I tried to pick the some of the simpler shapes with toothed edges.

I picked out red, orange, and yellow crayons and spread them in the center of the table for them to use.


In order for the stained glass effect to work properly you have to press hard with the crayons to get a thick coat on.

After everyone finished coloring they cut out their leaves.

Finally each kid got a paper towel that they placed their leaves facedown on one at a time. Then I went around as needed with the canola cooking spray, spritzed the leaf, and then the kids would rub the oil over the leaf with a cotton ball.

Once quick spritz was usually enough, you can spread the oil far with more pressure from the cotton ball.

TIP: For extra vibrant color rub oil on both sides of the leaves
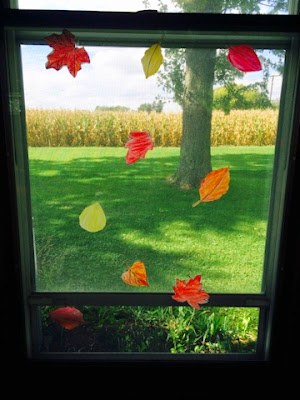
Finished! Just tape the leaves to the windows in whatever pattern fits your fancy! :)

Overall: This was a more time consuming project. Every child will go at their own pace. Continuously give encouragement and advice to color hard!

Related Posts:
-Week 4- Self Portrait
-Week 3- 3D Cube
-Week 2- 1 Point Perspective

(logging 1 1/2 hours for prep and execution including recap of past weeks)

Wednesday, October 1, 2014

Art Curriculum- Week 4- Self Portrait

Week 4- Self Portrait

Last week's lesson involved painting a 3D cube. To view it click here.

Artistic Movement: Renaissance

What you'll need:
-copy paper
-markers

Time: 30-45 minutes tops

The purpose of this lesson was to create a self portrait. They had to look at the colors of their clothing and any patterns and try to incorporate that into their picture.

I ran off multiple copies of a stick figure. The bottom left picture is mine. While I drew I continuously pointed out the color of their shirts, their eyes, or the fact some of them had stripes on their clothing.

The original intent was just to draw hair and clothes; but the kids asked about making grass and sky and flowers and so we ended up with these lovely drawings including gardens and castles. :)

For the most part they took this project in stride and I didn't have to instruct so much as give suggestions and try to guide them to being a bit more detailed in things like curly hair vs. straight hair.

Overall: The kids enjoyed the project immensely, it needed next to no prep, and required minimal instruction.


Related Posts:
Week 3- Tri Toned Cube
Week 2- 1 Point Perspective
Week 1- Gridding

(logging 45 minutes for prep and execution time)