Showing posts with label coloring. Show all posts

Tuesday, January 13, 2015

Art Curriculum- Week 15- Eye of Surrealism

Week 15- Eye of Surrealism

Welcome back to the 2015 school year! We began our 2nd half of the school year with a simple project on surrealism.

Our last project in December involved making "dancing snowmen" accompanied by a story involving what snowmen do at night. :) To view it click here.

Category: Surrealism

What you will need:

-simple eye coloring sheet (I drew my own eye, but if you don't want to Google has an endless supply)
-markers (2 different blues = 1 light/1dark, a black marker)

Time: 30 minutes (at the most)
  • Each child got their own eye to color and a blank piece of paper
  • I taught them how to make clouds (pictured below) and rain drops. We discussed our favorite kinds of weather. I then explained that what we were doing was called surrealism, where you take something normal and put a twist on it. So if you're favorite weather was a pink and orange sunset and you really liked trees; then you could paint a pink and orange sunset with a pretty tree in your eye to represent that.


Practice Sheets:


  • Draw clouds first in lighter blue and raindrops in darker blue
  • color the raindrops dark
  • fill in the rest of the sky with the lighter blue
  • draw in the pupil with a black marker

And taa-daa! That's it!


Overall: A very simple project and easy to execute if pressed for time.

Related posts:

-Fauvism and Zebras
-Self-Portrait

(logging 1 hour for prep and execution)

Wednesday, November 19, 2014

Art Curriculum- Week 9- Fauvism and Zebras


colorful zebras

Week 9- Fauvism and Zebras

Last week's blog post involved copying one of Vincent Van Gogh's paintings, to view it click here.

Artistic Movement: Fauvism

What you'll need:

-printer (regular copy paper)
-markers

Time: 30+ minutes (it depends on the coloring sheet you choose, and the level your young artists are at!)

Fauvism:

"...emphasized painterly qualities and strong color over the representational or realistic values retained by impressionism."
(quote taken from Wikipedia)
  • A very simple project to prepare for, all I had to do was look up coloring sheets of zebras.
  • As a bonus, look up fauvism in trees, animals, zebras, horses, etc. to show the kids. I knew that if I was going to have them coloring in what adults would usually consider "bad" I needed to provide a reason for it! I showed them a variety of examples of fauvism, explaining and pointing out the use of color and what it meant.
  • I have a wide pool of ages to provide for, all on different levels of patience, so I ran off options that ran on 2 different difficulty levels.
  • The rules were:
    -No black/brown/skin colors
    -No two stripes could touch if they were the same color
  • I was surprised however when 2 of the younger ones finished their simple zebra head and asked for more to color. I gave them a go at trying a "big kid" coloring sheet and they did very well.
  • The amount of time for this project is specific to your own group of kids. Some kids are naturally quicker at coloring while others must painstakingly make every marker stroke perfectly in line.
Overall: The kids surprised me, this fan group of "no coloring" spent a lot of time and detail on each of their pieces. A fun project that's easy to prepare for. 


Related Posts:

-Week 8- Van Gogh's Fields
-Week 7- Monet's Bridge
-Week 5- Stained Glass Leaves

(logging 1 hour for prep and execution)

Monday, October 6, 2014

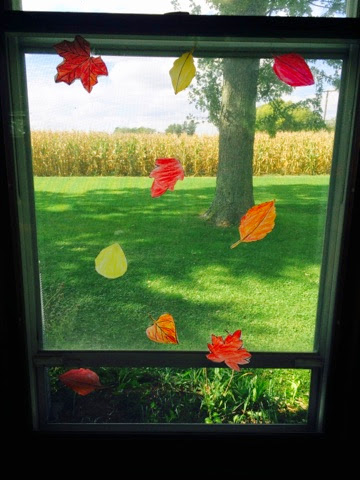
Art Curriculum- Week 5- Stained Glass Leaves

stained glass leaves

Week 5- Stained Glass Leaves
Last week's lesson involved coloring and creating a self-portrait. To view it click here.

Artistic Movement: Impressionism (loosely - you can tie it in with the vibrant colors and impression of warmth and vivid happy feelings the colors are associated with)

What you'll need:

-Copy paper
-baby oil/cooking spray/canola oil (any one will do, baby oil is the most popular choice but we managed with cooking spray just fine)
-crayons
-cotton balls
-paper towels

Time: 45 minutes + 15 minute recap of previous weeks

The purpose of this lesson was to have fun and it required them to use their cutting skills.

I looked up leaf templates and coloring sheets, then I copied and pasted the ones I liked into a word document. I had 3 leaves per page. Then I ran off 6 copies of each so each kid would have 9 to color and cut.

Because some of them are young and most of them haven't built up much patience I tried to pick the some of the simpler shapes with toothed edges.

I picked out red, orange, and yellow crayons and spread them in the center of the table for them to use.


In order for the stained glass effect to work properly you have to press hard with the crayons to get a thick coat on.

After everyone finished coloring they cut out their leaves.

Finally each kid got a paper towel that they placed their leaves facedown on one at a time. Then I went around as needed with the canola cooking spray, spritzed the leaf, and then the kids would rub the oil over the leaf with a cotton ball.

Once quick spritz was usually enough, you can spread the oil far with more pressure from the cotton ball.

TIP: For extra vibrant color rub oil on both sides of the leaves
Finished! Just tape the leaves to the windows in whatever pattern fits your fancy! :)

Overall: This was a more time consuming project. Every child will go at their own pace. Continuously give encouragement and advice to color hard!

Related Posts:
-Week 4- Self Portrait
-Week 3- 3D Cube
-Week 2- 1 Point Perspective

(logging 1 1/2 hours for prep and execution including recap of past weeks)