Monday, October 6, 2014

Art Curriculum- Week 5- Stained Glass Leaves

stained glass leaves

Week 5- Stained Glass Leaves
Last week's lesson involved coloring and creating a self-portrait. To view it click here.

Artistic Movement: Impressionism (loosely - you can tie it in with the vibrant colors and impression of warmth and vivid happy feelings the colors are associated with)

What you'll need:

-Copy paper
-baby oil/cooking spray/canola oil (any one will do, baby oil is the most popular choice but we managed with cooking spray just fine)
-crayons
-cotton balls
-paper towels

Time: 45 minutes + 15 minute recap of previous weeks

The purpose of this lesson was to have fun and it required them to use their cutting skills.

I looked up leaf templates and coloring sheets, then I copied and pasted the ones I liked into a word document. I had 3 leaves per page. Then I ran off 6 copies of each so each kid would have 9 to color and cut.

Because some of them are young and most of them haven't built up much patience I tried to pick the some of the simpler shapes with toothed edges.

I picked out red, orange, and yellow crayons and spread them in the center of the table for them to use.


In order for the stained glass effect to work properly you have to press hard with the crayons to get a thick coat on.

After everyone finished coloring they cut out their leaves.

Finally each kid got a paper towel that they placed their leaves facedown on one at a time. Then I went around as needed with the canola cooking spray, spritzed the leaf, and then the kids would rub the oil over the leaf with a cotton ball.

Once quick spritz was usually enough, you can spread the oil far with more pressure from the cotton ball.

TIP: For extra vibrant color rub oil on both sides of the leaves
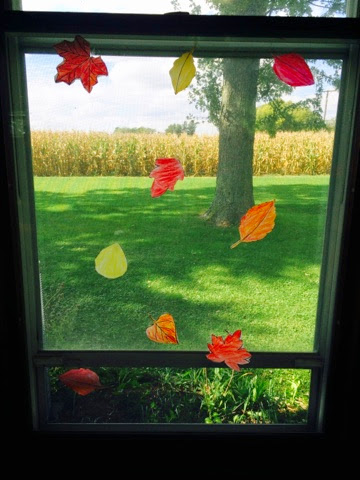
Finished! Just tape the leaves to the windows in whatever pattern fits your fancy! :)

Overall: This was a more time consuming project. Every child will go at their own pace. Continuously give encouragement and advice to color hard!
Related Posts:
-Week 4- Self Portrait
-Week 3- 3D Cube
-Week 2- 1 Point Perspective

(logging 1 1/2 hours for prep and execution including recap of past weeks)

Wednesday, October 1, 2014

Art Curriculum- Week 4- Self Portrait

Week 4- Self Portrait

Last week's lesson involved painting a 3D cube. To view it click here.

Artistic Movement: Renaissance

What you'll need:
-copy paper
-markers

Time: 30-45 minutes tops

The purpose of this lesson was to create a self portrait. They had to look at the colors of their clothing and any patterns and try to incorporate that into their picture.

I ran off multiple copies of a stick figure. The bottom left picture is mine. While I drew I continuously pointed out the color of their shirts, their eyes, or the fact some of them had stripes on their clothing.

The original intent was just to draw hair and clothes; but the kids asked about making grass and sky and flowers and so we ended up with these lovely drawings including gardens and castles. :)

For the most part they took this project in stride and I didn't have to instruct so much as give suggestions and try to guide them to being a bit more detailed in things like curly hair vs. straight hair.

Overall: The kids enjoyed the project immensely, it needed next to no prep, and required minimal instruction.


Related Posts:
Week 3- Tri Toned Cube
Week 2- 1 Point Perspective
Week 1- Gridding

(logging 45 minutes for prep and execution time)

Tuesday, September 23, 2014

Art Curriculum- Week 3- Tri Toned Cube

Week 3- Tri Toned Cube

Last week's lesson involved 1 Point Perspective. To view it click here.

Artistic Movement: Renaissance

What you'll need:
-tempera/craft paint
-printing size paper (I used copy paper, but the kind you use is up to you)

Time: 20 minutes approximately

The purpose of this lesson was to try to teach the kids about light and shadows. An early start on shading and explaining what a "light source" is.

I allowed the kids the ability to choose their own color but only offered red, blue, and yellow (I used this as an opportunity to have them recall the primary colors to me).

In the picture below you can see the gray scale picture I printed. I showed it to them and pointed out the really bright side, the extra dark side, and the in between side and tried to explain what caused the different shades of color.

What I did as a coloring sheet for the kids: I looked up Tri colored cubes and searched until I found a coloring sheet in the shape I wanted and printed off multiple copies of it.

When each child has his/her color, I had them color the top diamond on it's side.

Then I gave them each white, and helped them carefully mix the blue and the white to create a lighter hue.

In a similar manner I gave them black to achieve the darker shade. They only need a tiny dab of black.

Overall: This was a very easy project to prep and took very little time. The kids (depending on the age group) will probably need help figuring out which portion of the cube is left or right. :)

-Creating an Art Curriculum

(logging 1/2 hour for prep and execution)

Sunday, September 21, 2014

A Poem for Fall!

An poem to celebrate the arrival of Fall! :)

To the tune of A Few of My Favorite Things from The Sound of Music.
__________

Pumpkins and lanterns and worn out grey sweaters
Spices and sweet treats and south turning ventures
Soft bars and cookies all smothered with cream
These are a few of the things that I see

Crips winds and bright trees and wilting dark flowers
Red leaves and gold leaves delight all the hours
Hot soups and fresh squash with colorful themes
These are a few of the things that I see

Multi toned corn cobs and frosty dew warnings
Hot tea and new books and dark blanket mornings
Warm scented candles that conjure up dreams
These are a few of the things that I see

When the cold comes
When the air stings
When I’m feeling down
I simply consider the things that I see
and then I don’t feel so bad
__________

Related Posts: Song for Fall (2013)

Monday, September 15, 2014

Art Curriculum- Week 2- 1 Point Perspective

Reference Picture

Week 2- 1 Point Perspective

Last week's lesson involved basic gridding. If you want to view it you can click here.

This week's lesson was 1 Point Perspective.

Artistic Movement: Renaissance

The project was good practice for watercolor painting with different methods and listening to instructions.

What you'll need:
-watercolors
-plain art paper of some kind (it doesn't have to be fancy but for water colors you want paper other than regular copy paper so that the watercolors have some texture to soak into)

Time: 40 minutes approx.

The original painting (pictured above) is something I found on Pinterest. I used it as a reference and quickly drew 7 rough copies of it using a sharpie.

I kept it basic, explained how when things are far away they get smaller and smaller whereas when things are closer they get bigger. I used a paint bottle on hand and I zoomed in back and forth in front of them.

This was another piece that I did step by step with the kids. I gave them one color at a time and we moved in stripes down the page. Blue-Orange-Yellow-Purple-etc.

For the red and orange ground I had them "messily" color within the lines with red leaving wide spaces. Then I gave them the orange and had them fill in all the white spots. I wanted there to be a bit of color mixing going on without creating mud.

The road we used black paint but I had them practice using lots of water with their brushes while taking tiny dabs of paint to achieve a lighter gray.

Overall: Easy and fun project. Simple cleanup (watercolors don't stain) and the kids love painting so it was a great learning experience.

In Addition: Something you might want to point out and explain is that cooler colors (blue, deep purple, etc) make things look farther away, while warmer colors (red, yellow, etc) make things appear closer. ;)


Related Posts:

Art Curriculum- Week 1- Gridding
Creating an Art Curriculum

(logging in 1 hour for prep and execution)