Sunday, November 23, 2014

Blogger Recognition Award


This week in honor of Thanksgiving we are taking a break from our homeschooling endeavors.

Today I am posting about the "Blogger Recognition Award." Emily Tjaden, at Dreaming Hobbit, nominated me for this award a couple weeks ago. I offer my most delighted thanks to Emily!

You can find her page on Facebook, here.

What this award entails is:
  • Thank the person who nominated you.
  • Leave a link to their page.
  • Give a brief story about how you started blogging, and share some tips.
  • Nominate 15 other bloggers.
  • Notify your other nominees by email or comment.

How I Started Blogging


I decided to start a blog (and a Facebook page) because I thought it would be a fun way to begin sharing my art under a more official setting. It's been over a year since I started Bright's Wanderings and I'm still refining and learning about this whole blog thing. I also started it with the intent that come college time it would be something useful to have under my belt.

Tips

Keep a schedule. This is very helpful if you want to post consistently and with a set purpose.

Larger, simpler text with more spaces makes for easier reading.

Adding a photo to your post can help catch the readers eye and can emphasize your post's message. It's a nice addition for us visual learners. :)

Nominees

Here are the links to several blogs that I greatly admire and enjoy.

Apassionata - Leah K. Oxendine

Firefly Closet - Allison Tjaden

Blogs from Geekdom - Brad Williamson

In Darkness There is Light - Morgan L. Busse

The Ramblings of an Eccentric Writer - Hannah Mummert

Scribbles and Inkstains - Abigail Hartman

Writing is Hard Work - Roger Colby

Not the desired number of 15... Oh dear. Quality over quantity I guess.

Now comes the difficult part, contacting each of these people. Which means... I have to practically talk to them. I can hear the gasps of horror. Such is the life of an introvert.

Every single one of these bloggers deserves recognition. They have contributed some wonderful bits to the blogosphere. Enjoy!

Friday, November 21, 2014

Art Curriculum- Week 10- Pointillism

pointillism projects

Week 10- Pointillism

The past lesson was on Fauvism. To view it click here.

Artistic Movement: Pointillism

What you will need:

-tempera/craft paint
-Q-tips
-Brushes
-paint pallettes
-wood letters (I got these 1.87 a piece at Michael's, there was a variety of other options and different prices. If you don't want to go and buy the wood you can print bubble letters on construction paper have them paint them in in the same manner they paint the wood.)

Time: 45+ minutes (only because the paint has to dry, but it still dried relatively quickly)
  • Have each child pick one color. Apply the single color in a solid coat over the entirety of the letter.

  • Next pick 2 colors other than their first coat. Each child gets a Q-tip. There are 2 tips, one tip for each color.

  • Let them cover their letters with the dots in whatever pattern they wish.

  • Once they're dry they're done!
Ideas that you can use these letters for:

-Christmas ornaments
-stick them on to doors/walls/boxes for ornamentation

Overall: A fun painting project. Easy to prep for. It's a nice break from normal painting on paper. It's 3D and you can do lots of fun things with it.

Related Posts:

-Week 8- Van Gogh's Fields
-Week 7- Monet's Bridge

(logging 1 1/2 hours for shopping, prep, and execution time)

Wednesday, November 19, 2014

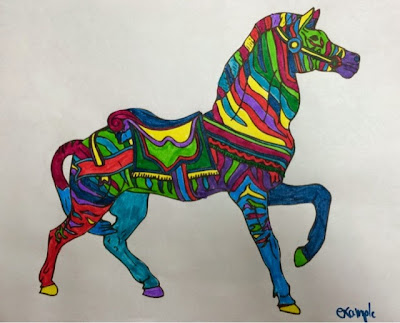
Art Curriculum- Week 9- Fauvism and Zebras


colorful zebras

Week 9- Fauvism and Zebras

Last week's blog post involved copying one of Vincent Van Gogh's paintings, to view it click here.

Artistic Movement: Fauvism

What you'll need:

-printer (regular copy paper)
-markers

Time: 30+ minutes (it depends on the coloring sheet you choose, and the level your young artists are at!)

Fauvism:

"...emphasized painterly qualities and strong color over the representational or realistic values retained by impressionism."
(quote taken from Wikipedia)
  • A very simple project to prepare for, all I had to do was look up coloring sheets of zebras.
  • As a bonus, look up fauvism in trees, animals, zebras, horses, etc. to show the kids. I knew that if I was going to have them coloring in what adults would usually consider "bad" I needed to provide a reason for it! I showed them a variety of examples of fauvism, explaining and pointing out the use of color and what it meant.
  • I have a wide pool of ages to provide for, all on different levels of patience, so I ran off options that ran on 2 different difficulty levels.
  • The rules were:
    -No black/brown/skin colors
    -No two stripes could touch if they were the same color
  • I was surprised however when 2 of the younger ones finished their simple zebra head and asked for more to color. I gave them a go at trying a "big kid" coloring sheet and they did very well.
  • The amount of time for this project is specific to your own group of kids. Some kids are naturally quicker at coloring while others must painstakingly make every marker stroke perfectly in line.
Overall: The kids surprised me, this fan group of "no coloring" spent a lot of time and detail on each of their pieces. A fun project that's easy to prepare for. 


Related Posts:

-Week 8- Van Gogh's Fields
-Week 7- Monet's Bridge
-Week 5- Stained Glass Leaves

(logging 1 hour for prep and execution)

Tuesday, November 11, 2014

Art Curriculum- Week 8- Van Gogh's Fields

brights wanderings

Week 8- Van Gogh's Fields

The previous lesson involved Monet's Bridge.To view click here.

Artistic Movement: Impressionism

What you'll need:

-tempera/craft/acrylic paint (blue//light blue/white/yellow/red)
-medium sized brushes
-paper (I used white construction paper)

Time: 45 minutes

I drew a line to where I wanted the sky to come down to so that the kids would have a guide.

We used 2 different shades of blue for the sky. I had them make squiggly horizontal lines to give the sky more texture.

I gave them white and had them do a quick squiggly line at the edge of the blue.

The rest of page we painted yellow, I likened it to corn and wheat so they needed to make their lines up and down for the stalks. Then I had gave them a dark red. I allowed them one dip in the red, then they had to use only that one dip's worth of red to add to the yellow.

The birds are black paint. Either a wobbly "V" or 2 hills next to each other.

Overall: A relaxed painting project. Simple step by step.

(logging hour for prep and execution)

Monday, November 10, 2014

Art Curriculum- Week 7- Monet Bridge


Week 7- Monet Bridge

The last lesson involved making stand up pumpkin "books." To view it click here.

Artistic Movement: Impressionism

What you'll need:

-tempera/craft/acrylic paint (green/yellow/blue/purple/pink/black)
-paper (I used white construction paper)
-medium brushes

Time: 45 minutes to an hour

This is a more time consuming project. It requires more patience and step by step instruction.

I drew the bridge in pencil on each page before we began painting so that there was a reference point to use.

I started by showing them pictures of weeping willows and lily pads. I also showed them some of Monet's paintings.

I showed them how the weeping willows go "up and down" and the water and the lilly pads go "back and forth."

I started with green, then progressed to yellow with up and down strokes.

The water (blue/purple) goes back and forth. For the lilly pads I had them making little stripes of green. Then on every green little line I had them put a pink dot.

The pencil drawing of the bridge still showed through the paint and so I guided them in tracing them.

Overall: The kids handled this project very well, but it is good to have kids who've had experience in following step by step instructions and have more patience.


(logging 1 1/2 hours for prep and execution)